Archiving a course saves all historical aspects of the course, including the student roster information, activities, tests, and grades to a local disk or computer. Archiving does not remove the course from Blackboard.
1. Log into Blackboard and go into the course.
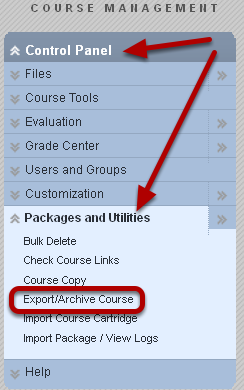
2. Under Control Panel and Packages and Utilities, click Export/Archive Course.
3. Click the Archive button
4. Select Copy Options
NOTE: An archived course will contain grade center data. However, as a course "snapshot" it will only include the final, most current Grade Center information. If you click to enable the check box next to Include Grade Center History the archive will include ALL Grade Center information.
5. Decide How to handle File Attachments
At this point we are not checking for file size. We recommend that you UNCHECK the box, "Limit package to ...." This will enable you to archive ALL of the course content, rather than links to files.
6. Click Submit
Assuming no problems, a "Success" banner will appear across the following page, indicating that the archive request is being processed. you will receive an email when the archive is completed.
7. Go back again to Step 2, Package and Utilities>Export/Archive Course
8. Click on the archive file you will see listed
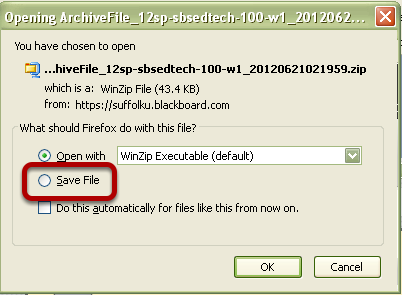
9. Save the file to either your hard drive to to another desired location
NOTE: Do not open the zip file, as it can corrupt the file. The archive file can be restored, but it is not intended to be used to teach the course again since it contains all previous user interactions. If you do need to view the material in Blackboard again, contact OTM for help.


