Adding Collaborate to a Blackboard course is a two-step process. First you add a link to the tool in the Course Menu. This is the second step of creating the actual Collaborate room (session) itself .
Adding Collaborate to a Blackboard course is a two-step process. First you add a link to the tool in the Course Menu. This is the second step of creating the actual Collaborate room (session) itself .

NOTE: SBS faculty should have already created a link in the course menu to Collaborate Web Conferencing. All other faculty will access Collaborate under the Tools menu


The Session Title defaults to the course name. We recommend you change the name to something more meaningful.
NOTE: However, you wish to set up a virtual office in each of your Blackboard courses, you could create a Shared Session, choose the courses that you want to have a virtual Office, and then click Submit. The system will automatically create a Virtual Office in each of the courses you have designated.

The End time is not a strict cut-off; the session will remain open until all of the participants have left the session.
NOTE: One year is the maximum duration for any session. Amy longer will return an error.
We recommend allowing students to enter the session 15 minutes before the start time. This gives participants time to conduct the Audio Setup Wizard if they haven't already done so. We also recommend that you be present in the session at that time as well.

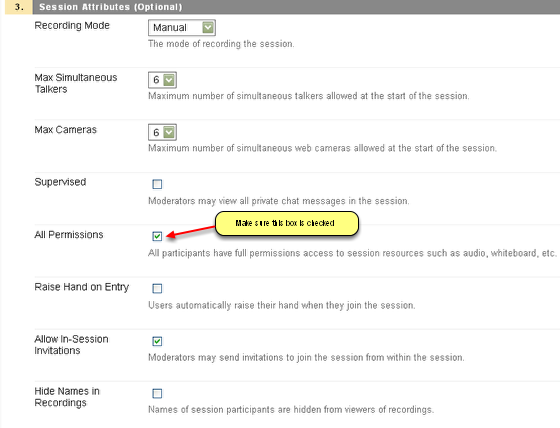
We recommend the settings as shown above for general recordings.
NOTE: You must check All Permissions even in order for participants to be able to text chat.
Recording Mode
Manual – Moderator activates recording
Automatic – Recording starts when the first person enters the session
Disabled – Session will not be recorded
Maximum Simultaneous Talkers and Cameras – up to six simultaneous talkers and cameras can be activated for the session. The moderator can change the number during the live session.
Supervised – allows moderators to view all private chat messages in the session.
All Permissions – all participants will have full permissions when they enter the session. Permissions are audio, video, chat and whiteboard. The moderator can give and take away permissions during the session.
Raise Hand on Entry – when a participant enters the session their hand will be automatically raised thereby notifying the moderator that someone has entered the room.
Allow In-Session Invitations – the session URL will be available to send from within the session so others may join the session.
Hide Names in Recordings – names of session participants are hidden from viewers of the recording. Names are replaced with Participant 1, Participant 2, etc.

Assign Roles
Restrict Participants – to restrict access to the session to a sub-set of the participants registered in the course. Participants can then be assigned the role of Moderator or Participant.
**All Moderators **– to assign the role of moderator to all session participants.

You must first complete the Display Name and Email Address fields and then secondly, click Add. You will notice the name and address has been moved to the Selected Invitees area. An email will be sent to the user with a URL to join the session. The URL is unique to that participant.

1. Preloads – content can be preloaded into a session. The following file types are supported: .wbd, .wbp, .elp, .elpx, .swf, .m4v, .mp4, .mpg, .mpeg, .mpe, .mp3, .qt, .mov, .wmv
2. Telephony – a teleconferencing for audio can be added to the session, although it is not a feature that is automatically available. Once provided, the teleconference session supports a mix of VOIP and telephone audio.

Still on the Sharing Tab, Notes can be added for the moderator and for participants. These notes are available on the details page and viewable prior to joining the session.

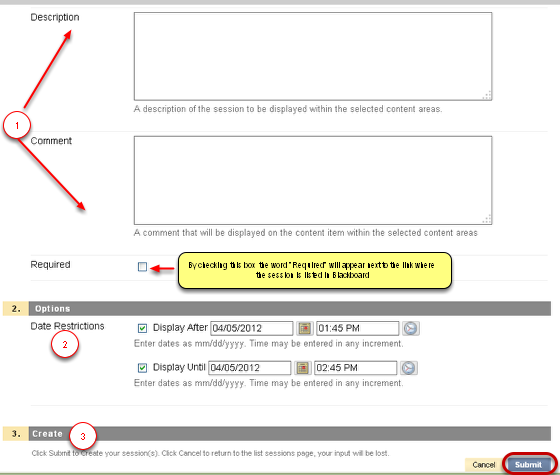
This gives you the option to directly access the web conferencing session from another content area in your course. Select from the Available Area List and move the desired area to the Selected Content Areas. This means that a participant could access Collaborate from either within course Materials or Course Media.

1. If you choose to have Collaborate accessible from another area, you can add a description and/or comments if desired about the Collaborate session if desired.
2. Options - Set a date restriction on access to the session. Click Submit to create your session.
3. Click Submit to create the session.