This document will walk you through creating a new recording after completing configuration of the Recorder.
This document will walk you through creating a new recording after completing configuration of the Recorder.

Click Login.

If you have just configured your Recorder, and checked the box Save Login and Password then your screen will be prefilled for you.

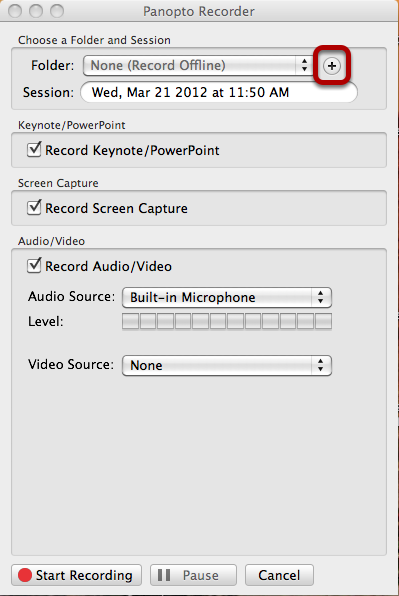
IMPORTANT: To create recordings you first have to create a folder, and then add sessions to it.
By default, the Recorder will open up to the last known good configuration of recording devices. If you have recorded content before, the same devices will automatically be chosen.

IMPORTANT: Before you type in Folder Name and click Create, please read the Folder naming conventions below.
Folder Naming Structure
It is essential that every user who creates a recoding follow an established folder naming convention. This helps organize all recordings within the system, prevent recording conflicts between users and creates a folder structure that is easy to view and search. While users have a lot of freedom in creating their own recordings at any time, this is one step that we request you follow as indicated. Folders not following this naming convention may be deleted at the discretion of the system administrator, after notifying the user.
To create your folder name:
*1. Start with an Identifier: School Initials - Dept/Program/Subject/Course - CourseNumber/Abbreviation of Folder Name*
Examples:
SBS-ACCT-202
SBS-MBA-NSO
SBS-Admissions-GA
SBS-EdTech-BB
SBS-CFP-315
*2. Then include the folder name description: Title of Course, Program, Conference, or Subject*
Examples:
Accounting for Decision Making
MBA New Student Orientation
Graduate Admissions
Blackboard Training Videos
Principles of Investment
*3. The Folder Name should look like this: SBS-ACCT-202: Accounting for Decision Making*
For Business School: SBS
For College: CAS
For Law School: SULS
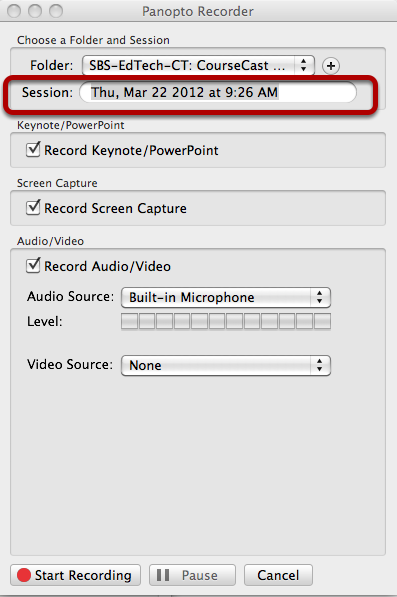
The date and time are entered as the Session Name by default. You must change it to reflect the title and nature of the recording before you begin.
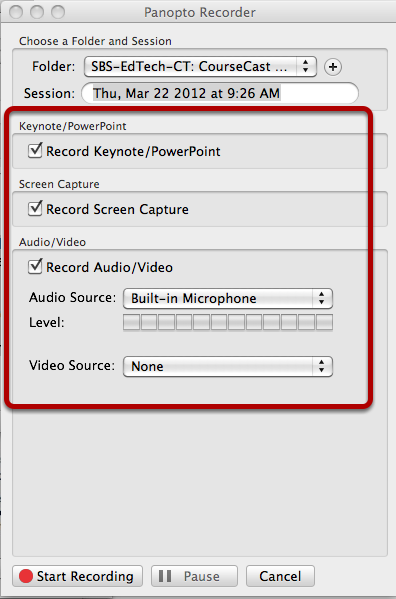
Whether you are recording offline or to a desired Folder, you can choose the devices that you wish to record with. These devices include web cams, video cameras, audio inputs, screen captures, PowerPoint/Keynote and remote devices. To select the device you wish to use in your recording, simply check the box next to the device(s) listed within the Mac Recorder application.
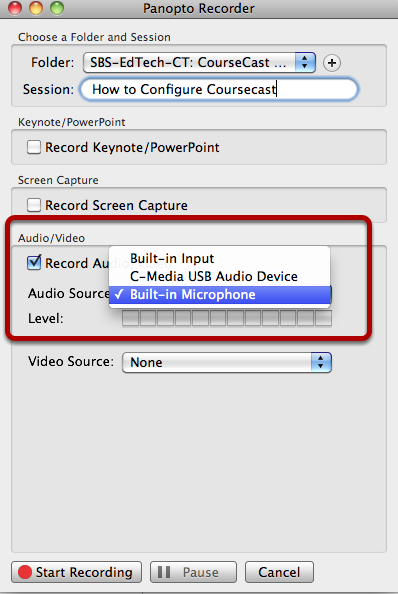
Audio and/or Video is required for all recordings to complete and be posted to the web.
Several audio devices may be displayed depending upon what you have connectecd to your computer. Using the Dropdown box next to Audio Source: simply choose the audio device you wish to use.

You may wish to add video to your recording. Choose from the available cameras attached to your computer under the Video Source: drop down menu. The primary video source you select will become your main video during playback. If you add additional video sources, for example to record a whiteboard, they will be viewable in tabs that will be added to your presentation.
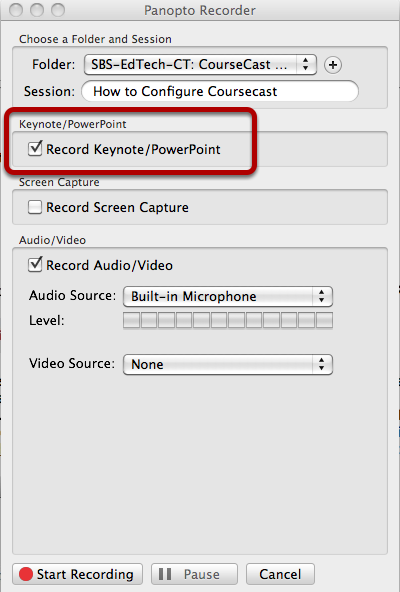
You can include Keynote or PowerPoint presentations in your recording.
1. Check the Record Keynote/PowerPoint source
2. Find the presentaion that you wish to include, open it, and minimize it.
3. The Recorder will automatically record any Keynote or PowerPoint presentation once you click Start Recording.

Selecting Record Screen Capture will allow you to capture everything that is being displayed on your computer screen. Recording of your screen begins once you have clicked Start Recording.
NOTE: Once you start the Recorder, minimize the Panopto Recorder window so that it will not be part of what you capture on the screen.
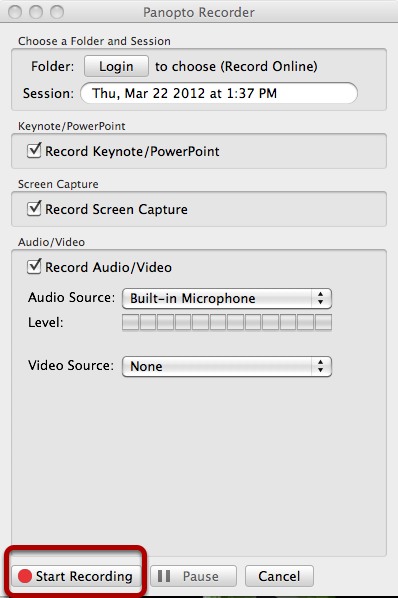
Remember, you can choose any combination of devices you need for your recording. Once you are satisfied with the devices you will be using, click on the red Start Recording button to begin the Recording Process. You will see a status message with a timer display to let you know the recording has begun.
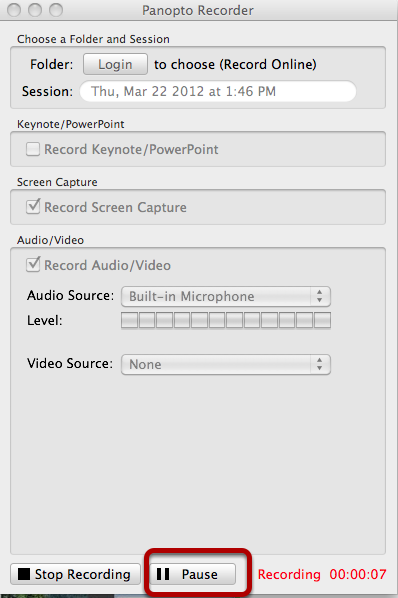
If you need to pause during recording, click on the Pause button next to the Stop Recording button. When you are ready to start again, click the Pause button again

To stop recording content, switch back to the Mac Recorder (Command +Tab), and click on "Stop Recording"
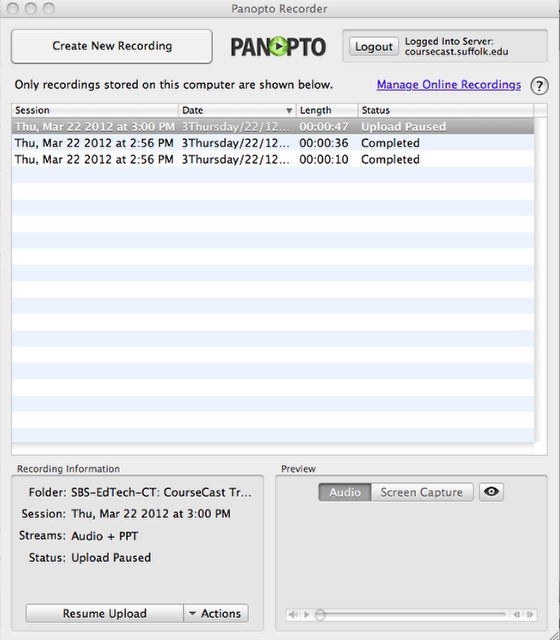
After ending a recording with the Mac Recorder you will be taken to the status screen. Here you will be able to free up room on your hard drive, find links to completed recordings, share recordings and see the progress of recordings that are not yet available for viewing.
Session - Shows the session name, denoted by the User.
Date - The date of which the recording was done.
Length - The duration of the recording.
Status - Shows the progress of the recording. By default the Mac Recorder will upload recordings once the User stops the recording.

Preview - During the upload progress or post upload, the "Preview" function allows playback of either the audio, video (with audio) or screen capture of the recording. Click to enlarge the view of the preview playback of the recording.
Recording Information - Provides the details of the recording; the "Folder" to which it is being saved to, the "Session" name, what "Streams" were recorded, the "Status" of the recording, "Links" to view the recording online or share the recording with other. If the recording has a status of "Completed" there are two buttons; "Delete" and "Actions.
Delete - Gives you the ability to delete the recording from folder "Panopto Recordings" on the local machine, which will free up hard drive space.
Actions -> Show Files - Will open the recording named folder within the "Panopto Recordings" folder on the local computer, showing all files associated with that specific recording. Example - Show Files: Click the button Actions and choose Show Files
Once the recording is uploaded to the server, the Status will change to Completed and you can view a recording online or share it with others by launching the link from the CourseCast Recorder.
You have successfully completed a recording. The next step is to make it available to viewers.