WiFi: Windows 10 Setup Guide
Your Windows 10 computer will automatically find all wireless networks in range.
- Click the WiFi button in the bottom right corner of your screen to view the available networks.
- There are two Suffolk University WPA2 Networks: SU_Staff_WPA2 and SU_Student_WPA2. Select the appropriate one.
- Click Connect.
- Enter your university email user-id only without the @suffolk.edu) and password, then submit.
Sometimes, it may be necessary to connect manually.
Manually Connect to WiFi in Windows 10
Create the WiFi network
- Navigate to Network and Sharing Center.
- Use Cortana ("Ask me anything" box in taskbar):
Type "network and sharing" in Cortana search box. If you can't find it, click the white circle to the right of the Windows Start button.![]()
Select Network and Sharing Center in results.
- Use Start Menu:
- Click on the Windows Start button in the lower left corner.

- Select Settings.

- Select Network & Internet. The Status window will open.
- Click on the Windows Start button in the lower left corner.
Click Network and Sharing Center. This is the second link from the bottom of the page. The Network and Sharing Center window will open. 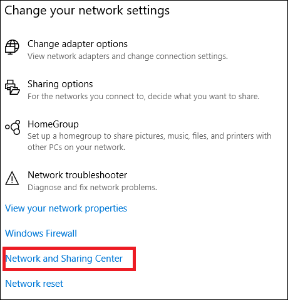
Click Setup a new connection or network.
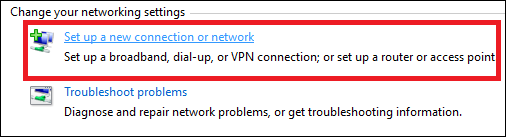
- SelectManually connect to a wireless network in the Set Up a Connection or Network wizard
- Click Next
- Network Name: SU_Staff_WPA2 or SU_Student_WPA2
- Select WPA2-Enterprisefrom the Security type dropdown menu
- Click Next.
- Click Change connection settings.
- NOTE: If you receive a prompt saying the network already exists, try to "Forget" the network in WiFi Settings > Manage WiFi Networks, or attempt to use a different name.
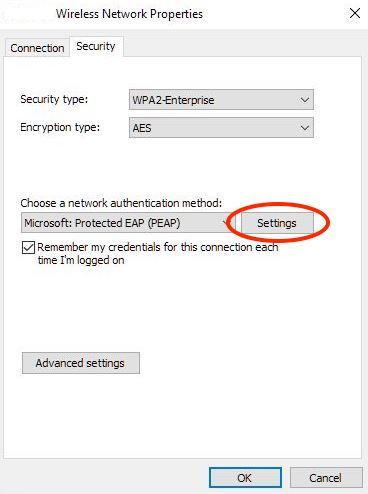
- Click the Securitytab in the Wireless Network Properties window
Click Settings under Choose a network authentication method.
- Set the following Protected EAP Properties:
- Select Authentication Method:Secured password (EAP-MSCHAP v2)
- Click OK.
- Click Advanced settingsbutton in Wireless Setup Properties window
- Check Specify authentication mode
- Select User authentication
- Click Save credential
- Enter your Suffolk University login credentials without the @suffolk.edu.
Click OK in all remaining open windows to finish setup.
Forget (delete) a WiFi Network profile in Windows 10
- Right click the Networkicon on the lower right corner of your screen
- ClickNetwork & Internet Settings
- Choose Wi-Fion the left navigation bar.
- Click Manage known networks
- Select the network you want to delete.
Click Forget. The wireless network profile is deleted.

Related articles