Creating Blackboard tests involves two separate steps: one is to create the test, and the second is to deploy it to a
Content Area and make it Available.
1. Go to the Content Area where you want the test, Click Assessments, followed by Test

2. Select the test you which to make available, then click Submit.
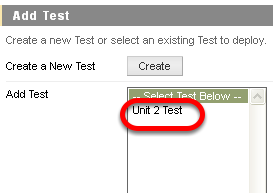
NOTE: All of the tests you have created will appear in the Add Test list Alternatively you can also create a new one from this screen.
3. Select the Test Availability options as indicated below
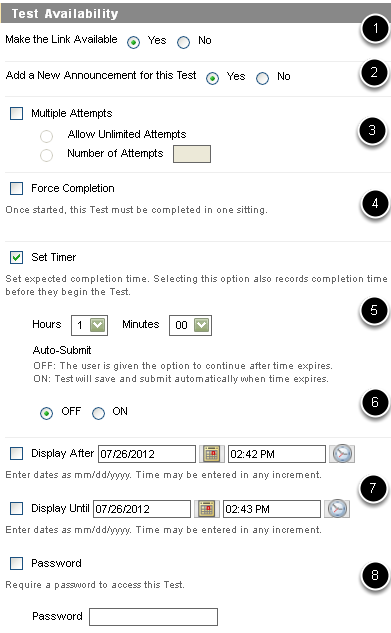
1. Link Availability - select “Yes” even if you decide you want to have a date restriction for when the test is visible to students.
2. Add new announcement - Allows you to create an announcement automatically
3. Multiple Attempts - checking this option will allow the student to take the test multiple times. If it is a graded test, you will probably want to keep this option off so that they can't restart the test if they don't like their grade. Also note, whenever a multiple attempt is started, the previous attempt is deleted from the Gradebook. Only the most recent attempt is saved. This is the best option, however, when the test is a self-assessment.
4. Force completion - Don't use this setting. This setting probably causes the most difficulty for students. When this is checked on, it removes the students' ability to exit and re-enter the test at a later time, even if the "save" progress buttons are used. This means the students must complete the test in the same session as when the test is initially launched. If the student closes her browser, her computer crashes, her Internet Provider boots her off, etc., then she cannot get back into the test. In that event, the instructor has to make the decision as to whether or not to let the student take the test again by resetting the attempt in the Gradebook. Resetting the attempt clears out all the previously given answers and will force the student to start over.
5. Set Timer - Instead of using the Forced Completion option to force students to take a test in one sitting, use the "Set timer" option instead. This setting records completion time for this Test. By setting the timer on and setting how long they have to take the test, you can see how long it took the student to complete the test, no matter how many times they may have accidentally closed their browser or been booted off.
6. Auto-Submit - You can force the test to submit automatically when the time limit is reached by turning "Auto-Submit" option ON. However, this will not allow students whom need more time on a test to go over the limit. If you would like to allow a student more time for a timed test, please see the tutorial, "Allow One Student More Time on a Timed Test/Quiz in Blackboard".
If Auto-Submit is OFF, Blackboard will not force a submission at the end of a timed test, but will warn the student when they have 1 minute left to submit the test themselves. Students may go over the time limit, but if a student goes over the time allotted, they do not get an automatic score. Instead, they will get an exclamation point in the Grade Center instead, and the Instructor will need to go into the Grade Center manually grade the test, in case the instructor needs to deduct points for going over the time allotted.
7. Test Display Date and Time - Click the small calendar icon to select a date on the calendar that you would like the test to be
displayed. Do the same for the time (select small clock.) Repeat steps in F for an end date for the test.
8. Password - If you choose you may set a password for the test and give it out to students. This is ideal if proctoring a test. The instructor can give the password to the proctor whom gives it out to students in a computer lab assembled to take the test.
4. Enter due Date and Self-Assessment Options if Desired

NOTE: The Self-Assessment default is to “Include this Test in Grade Center Score Calculations.” The Self-assessment Option is the second choice, “Hide Results for this Test Completely from Instructor….”
5. Select the Type of Test Feedback

NOTE: Many faculty initially go with the default to show the students just the score achieved. The other options may make it easier for cheating to occur. You could edit the test options after the test has been completed to allow students to see the correct answers.
6. Choose a Test Presentation Mode and Click Submit

NOTE: There are many differing opinions on which option is better.
1. The "One at a time" setting can prevent problems with time-outs during test taking, especially for tests containing Essay questions that take a long time to answer. The "One at a Time" presentation also forces Blackboard to save the students questions/progress as they move from question to question.
2. The "All at Once" presentation mode may be better for tests with small numbers of questions. If you are presenting your test in "All at Once" mode, please recommend to your students that they click the Save button next to each question as they proceed through the test. This will immediately save their answer to that question in the Gradebook. Otherwise, if a student is completing a long test and gets booted from the test before completing it, all their answers may be lost. If they were clicking the Save button for each question as they proceeded through the test, the questions they already answered would still be saved.
3. Choose to Randomize questions if desired. When the Randomize Questions option is enabled, each test taker receives a different order of questions. If the test allows for multiple attempts, different attempts by the same test taker yield a different order of questions.
7. The Test is Now Available to Students